Tuesday, 29 March 2011

Sculpting - Actress

The next stage in the puppet construction process is to sculpt the shape of the character onto the armature.
At this point Josh will be working on the Mail Man puppet and I will be focusing on 'Elle' the Actress.
In this post I will show the process of sculpting the characters body, ready to be moulded and cast in silicone.
I am using plastiline which is a soft malluable clay similar to plasticine. I apply the clay around the armature, making sure that the right areas line up. For example I ensure that I sculpt the knee in the same area that the armature is designed to bend.
I will only be sculpting the parts of the puppet that are exposed and therefore need to be cast in silicone. Areas that are covered by clothes will be bulked out and shaped using sponge. Most on the Mail Mans body will be made this way. I will be casting six silicone parts for the actress - 2 legs, 2 arms, 1shoulders and neck and 1 hair piece.
I like to rough out the entire figure so that I can see if the proportions are working. I then go back and add details. I print out a lot of reference pictures and pin them around my desk so I can always keep checking my sculpt in comparision the the maquette I made earlier.
The above picture shows the process of sculpting the arms.
The forearms connect to the the rest of the arm at the elbow. Finally here are some turn around pictures showing the progress so far. The sculpt still needs to be smoothed and cleaned up. Also I will add detail the the shoes.
Next I will be sculpting the actresses head and showing how I plan to create different facial expressions.

Monday, 21 March 2011

Ball & Socket Joints

Ball and socket joints are used in puppet armatures as an alternative to aluminium wire. The advantage of using them is that they will not snap like wire, and their tension can be controlled to tighten or loosen the joint.
Unfortunatley they are dificult and expensive to make.
I've decided to use ball and socket joints at the necks of my characters because I feel they give good smooth movments that can't be created using wire. As most attention is paid to the characters faces I need the heads to have controlled subtle movments.
Above are a selection of ball and socket joints that I have manufactured. On the left is a larger joint made from brass. This one is for the Theatre Usher. The other three are made from brass and steel and are for the two Mail Men and the Actress.

For the chunkier joint I used solid brass beads soldered onto brass rod. The sandwich plated are drilled brass bar, threaded on one side for the bolt to tie into.

These smaller joints are made from 5mm steel ball bearings that I drilled and soldered steel rod into. Its important not to scratch the ball bearings otherwise they will not give a smooth motion. The side plates are again made using drilled brass bar. The plates are held together using M2 nuts and bolts.

On either end of the joints I soldered K&S to alow them to slot onto the shoulders and the head. To see the joints on the puppet armatures check my previous post.

Wednesday, 16 March 2011

Character Armatures Continued

Below are the finished wire armatures of the three main characters in my film. From right to left these are the Actress (Elle), the Mail Man (Roy) and the Theatre Usher. Each armature is constructed using the same principles of twisted aluminium wire and K&S tubing for replaceable limbs.
Below is the armature for Roy the
Mail Man. This is one of two identical armatures I've made of this character.
Next is the armature for Elle the Actress. She has a for feminine figure
I added steel wire to the feet to act as heels. These will strengthen the feet and give me a base to work on when I sculpt the shoes later.
The Theatre Usher's armature is a lot bulkier than the others. I used thicker twists of wire to help support the puppets larger size. At this stage the character looks short compared to the others. When the puppet is bulked out and his large shoulders are added he will end up being the biggest character in the film.
You might noticed that these puppets have ball and socket joints for necks. In my next post I will explain how I made them and why I decided to use them at the neck.

Thursday, 10 March 2011

Character Armatures

In this post I will be showing how the characters armatures are constructed. I'm making a total of 4 armatures - 2x Mail Man 1x Actress and 1x Theatre Usher. Each armature is made with the same materials and techniques but the proportions change depending on the characters shape and size.
I used the Armature design sheets (posted earlier in this blog) as a guide for cutting out all the components. They also ensure that the puppets will be the correct scale.
First I cut all the components ensuring that they are the correct length. The K&S Brass tubing allows limbs to be disassembled. The aluminium tubing keeps parts of the arms and legs ridged so they can only bend in the areas I want them too. Above are the parts for the first Mail Man.
Above are some of the components laid out for the Actress armature. Unlike the Mail Man, who's feet are removable at the ankles, her feet and legs will be one part.


The next stage is to twist the Aluminium wire and glue all the parts together. I used a double twist of 2mm Aluminium wire for the arms and a triple twist for the legs. The exposed areas of wire are covered with heat shrink tubing to protect them from scratches. Any nicks or dents will shorten the life of the wire. Above are the Mail Man armature (right) and Actress armature after they have been assembled and glued together with epoxy. Each has two K&S rig points at the waist just in case the puppets will need external support later on.


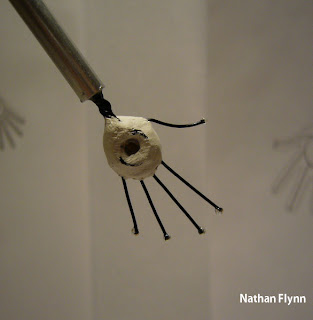
The hands are made in a similar way to the test I did earlier. Link
This time I used a smaller M2 Nut in the palm to save space. The actresses fingers are very thin, so I used a single wire for each finger instead a two.
I my next post I will show the complete armatures for the Actress, Usher and the two identical Mail Man Puppets.


Sunday, 6 March 2011

Puppet Feet

In this post I will show the process of making feet for the Mail Man and Actress Puppets. It's important to make the feet strong and sturdy because they will be supporting the rest of the puppet. Also they need to have a 'tie-down' system to anchor the feet to the ground.
I started by making foot plates out of steel sheet. I used a paper template the mark out the shape of the feet and where the tie down holes would go. Before cutting out each foot I drilled all the tie down holes. These holes will be where a bolt enters the foot to secure it to the floor.
I used a hack saw to cut out the feet and rounded the edges using a file. I then cleaned the steel with wire wool.
Each foot is cut into two halves to five the feet a toe bend. I labeled the feet so they didn't get mixed up.
I repeated this process to make feet for the Actress. As she is wearing small, pointed high heels, a toe bend was not needed. I bent the steel sheet to make the shape of the shoe. The long heels will be added later.
Next I cut K&S square brass tubing to be stuck onto each plate. This is to give me a channel to glue aluminium wire into.
The K&S is soldered into place along with M3 Nuts to act as tie downs. I will use M3 bolts and wing nuts, inserted from underneath the set floor to tie the puppets to the ground. Alternately I could use Magnets (attracted to the steel plate) to hold the puppets down.
Finally I glued 3x twist of 2mm Aluminium wire into the K&S on each foot plate. The exposed sections of wire are covered in heat shrink tubing to protect them from dents and scratches . The K&S above the ankle will slot into the legs of the puppet. The next stage will be to sculpt shoes around the feet armatures and cast them in silicone.