I used the Armature design sheets (posted earlier in this blog) as a guide for cutting out all the components. They also ensure that the puppets will be the correct scale.
First I cut all the components ensuring that they are the correct length. The K&S Brass tubing allows limbs to be disassembled. The aluminium tubing keeps parts of the arms and legs ridged so they can only bend in the areas I want them too. Above are the parts for the first Mail Man.
Above are some of the components laid out for the Actress armature. Unlike the Mail Man, who's feet are removable at the ankles, her feet and legs will be one part.The next stage is to twist the Aluminium wire and glue all the parts together. I used a double twist of 2mm Aluminium wire for the arms and a triple twist for the legs. The exposed areas of wire are covered with heat shrink tubing to protect them from scratches. Any nicks or dents will shorten the life of the wire. Above are the Mail Man armature (right) and Actress armature after they have been assembled and glued together with epoxy. Each has two K&S rig points at the waist just in case the puppets will need external support later on.
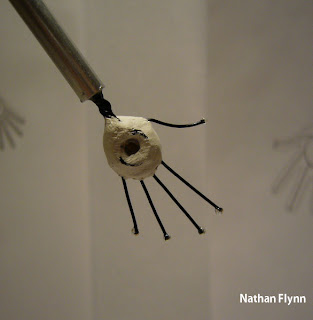
The hands are made in a similar way to the test I did earlier. Link
This time I used a smaller M2 Nut in the palm to save space. The actresses fingers are very thin, so I used a single wire for each finger instead a two.
I my next post I will show the complete armatures for the Actress, Usher and the two identical Mail Man Puppets.


Please, I would like to know where do you buy the animation wire the K&S etc. Is it a single store?
ReplyDeleteThanks
Hi Juan,
ReplyDeleteI usually pick up my K&S and wire from a local store.
It's probably cheaper to get them online though.
awesome work i have looked through all your posts and your work is amazing, you must have been sculpting for ages. also i get my K&S from this website http://www.cheshiremodels.co.uk/acatalog/k&s1.html
ReplyDeleteso Juan you can get everything from here
Just wondering how you went about getting the correct scale and proportions for your puppets/armatures.
ReplyDeleteLee -
ReplyDeleteI make scale drawings of the characters and design the armatures to match the characters proportions and fit inside their outline. You can see the drawings in my post 'Armature Designs'
http://nathan-flynn.blogspot.com/2011/02/armature-designs.html
hope this helps.
Also what did you use to cut your k and s tubing? everything ive used just crushes it.
ReplyDeleteLee -
ReplyDeleteI hold the K&S is a vice and cut using a hacksaw.
alternately you could use a dremel (rotary tool)with a cutting disk. The rough eldges of the cut can them be filed smooth.
Hi, Very inspiring blog you have. I like the idea of detachable hands and shoes. However, I was wondering, how do you make sure the hands cannot slide off too easily (e.g. during filming)?
ReplyDeleteHi Wienel,
DeleteI hammer a small bump into the outer K&S so the hands and feet slide in with a very snug fit.
That seems to do the trick.
Alternately you can attach a nut and grub screw to the K&S allowing the hand and feet to be removed using an allen key.