In this post I will be showing how I made replacement faces for the character 'Elle'.
Inspired by the system used in 'Coraline' we have chosen to make individual 'masks' that fit onto the puppets head. Each mask has a different sculpt to give the character a range of emotions and mouth shapes.
Earlier in this blog I showed how I cast the puppets head and ten identical face masks. You can see that post HERE. Also you can read about making faces for the Mail Man in Josh's blog HERE.

Firstly, I needed to solve the problem of sticking the masks to the head. They needed to be held firmly in a non-permanent way that allowed them to be removed and replaced during animation. The cleanest solution was to use small Neodymium magnets. I drilled two holes into the head that allowed the magnets to be counter sunk. One magnet below the eyes to hold the mouth masks and another on the forehead to hold the brow masks.

The magnets where glued into place with epoxy. Next I marked the location of the magnet onto the inside of each mask. This location indicated where a small amount of metal needed to be added. This is what the magnet would be attracted to, holding the mask in place against the head.

I cut the heads off some steel tacks and counter sunk them into the backs of the masks. The flat head and size of the tacks worked well with the magnets. If I had used to much metal the attraction to the magnet would have been too strong, making the faces difficult to remove. Not enough metal would mean the faces didn't stick. I added the tacks to all ten mouth masks and the three brow masks, gluing them into place using epoxy.

The next stage was to sculpt in the mouth details using Super Sculpey polymer clay. I started by sculpting the neutral mouth expression. In the picture above you can see the early stages of the sculpt. Also you can see some small progression with the dress.

Above are some more mouths sculpted. I'm only making the expressions that I need for this film so I've used the storyboards to help plan what mouth shapes are used. These include shocked, sad, bored and multiple different smiles. The three brows were sculpted into neutral, raised brow and frowning expressions.
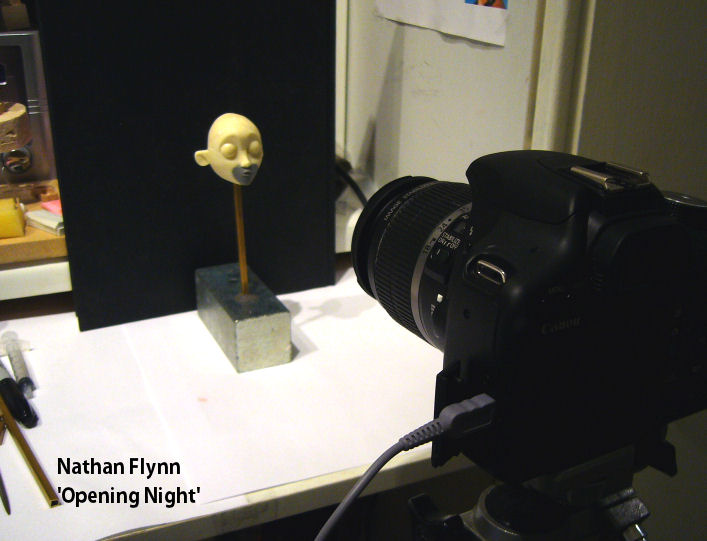
While sculpting the mouths I kept checking to see if they worked on camera. I used my Canon DSLR connected to a laptop with Stop Motion Pro 7. This gave me a live view and I could flick between captured images to see if the faces worked in relation to each other. I took pictures of the head from the front and from the side. Any problems were easily identified and corrected before that clay was baked hard.

The picture above shows all the masks I've made for Elle including ten different mouths and three brows. After baking these were sanded smooth ready for priming.

I painted the masks and the head with a white primer spray paint. This gives a good base coat for the next layer of paint to stick to. I suspended each part away from the surface so avoid any paint pooling at the edges. Also I masked the back of each face to stop any paint from sticking there. Any paint of the back might cause unwanted friction when putting the faces onto the head. I covered the front of the head with masking tape for the same reason.

After applying a few layers of primer and allowing it to set, I added the skin tone colour. Again I used a spray can. This was to ensure that each mask was the same colour. Mixing the paint and brushing by hand might have led to unwanted variations in colour. Also this spray paint will hold up better to constant handling.
I made sure that I matched this colour when I pigmented the silicone used for the arms and legs so all the skin tones on the puppet will be consistent.

Above are all the components after being sprayed. The next stage will be to paint details like teeth, lips and make-up onto each mask.
Thanks for reading.
Even the photographs you take are amazing!
ReplyDeleteLooking really good, and so great to see all the separate stages!! Can't wait to see it all :D
Love the way you and Josh mirrored and your blogs by the way, very Gerald :D
x
So you can heat the hard plastic faces in the oven along with the sculpey and the plastic is not damaged by the heat?
ReplyDeletecorrectamundo.
ReplyDeleteCooking at 130C for 15 mins didn't melt or burn the plastic. The heat will soften the plastic, making it a little flexible. To stop the mask from deforming I baked the faces while they were attached to the head. Once everything had cooled down the plastic went solid again and regained the correct shape.
Hi I love this blog, your documentation is very good! I was wondering was the ten mouths sufficient for fluid movement with your faces or do you have to make inbetweens for other expressions??
ReplyDeleteI have always been curious about replacement mouth process..
Hi
DeleteSorry for the slow reply.
I'm glad you like my blog :)
The mouths I've made work great for the film I'm working on, but our characters have no dialog so less mouths are reqired. To save time we've only made the faces we know we'll be needing.
If a puppets needed to perform lip sync and the full range of emotions them they would need a much larger selection of replacement faces.
The more faces there are, the smoother the animation.
I hope that answers your question.
Hi Folks, I`m looking for a puppet face similar to what Nina Conti uses , if you know what I mean.= Can you help me find one, for entertaining at children s parties, the mouth opens & shuts & she uses ventriloquism etc etc= hope you can help me ?
ReplyDeleteBest wishes
Neil McIntyre Australia= mooroopnahospital22@gmail.com
Love your work. Do you have any tips on how to repair and replace silicone puppet hands? They break so often..
ReplyDelete