Thursday, 28 April 2011

Little Old Lady

The three Main Characters in our film are 'Roy' the Mail Man, 'Elle'the Actress and the bulky Theatre Usher. These characters play crucial roles in the story, which is why both me and Josh are making fully articulated puppets of them. Side characters still need to made, but their construction can be more simplistic. In this post I'll be showing the construction of a secondary character from start to finish.

This Little Old Lady is one of the side characters that 'Roy' runs into during the film. Above is the digitally painted Maquette showing the characters design.

I started by making this armature, using the maquette as a guide. The character doesn't need to walk or move around too much so its designed to be mostly static. The only movable parts are the arms and neck. The feet have M3 nuts inside them to help bolt the puppet to the set floor. The legs are made from steel wire and larger parts of the character are bulked out with balsa wood. The arms and neck slot into the K&S points located in the chest.

After sanding the balsa wood into shape I started to apply clay onto the surface. I used Super Sculpey Firm and Liquid Sculpey to help the clay adhere to the balsa. Above you can see the original plasticine maquette to the left and the sculpt in progress on the right.

Before sculpting the hair I baked the head. This gave me a solid surface to work on and meant I wouldn't accidentally squash the facial details while focusing on the hair. The arms are made from aluminium wire and 'Bake-n-Bend' Sculpey. This is a polymer clay that once baked in the oven becomes rubbery. This means the arms can be repositioned and animated to give a little wave.

The glasses and her bag were sculpted separately. Instead of sculpting the dress I will be adding material around the balsa wood. using real fabric helps to add more texture to the character, rather than all solid painted surfaces.
Above is the finished sculpture after being primed white ready for painting.

I painted the figure by hand using acrylic paints. Plastic lenses were added to the glasses and glued onto the characters head.

Having the character break apart into separate components makes painting the character a lot easier. The pattern on the dress has changed slightly from my original design. We found a pink polka dot material that I feel fits the 50's theme a lot better. The dress was glued into place with contact adhesive.

Finally I assembled all the pieces together and the character was complete, ready for filming.
Once I'd finished I realised the figure was able to balance on it's own without tie downs, so I took the pictures above.
We haven't given her a proper name yet. We just call her Little Old Lady. I'm open to any suggestions.

Thanks for reading.

Tuesday, 26 April 2011

Replacement Puppet Faces

In this post I will be showing how I made replacement faces for the character 'Elle'.
Inspired by the system used in 'Coraline' we have chosen to make individual 'masks' that fit onto the puppets head. Each mask has a different sculpt to give the character a range of emotions and mouth shapes.

Earlier in this blog I showed how I cast the puppets head and ten identical face masks. You can see that post HERE. Also you can read about making faces for the Mail Man in Josh's blog  HERE.

Firstly, I needed to solve the problem of sticking the masks to the head. They needed to be held firmly in a non-permanent way that allowed them to be removed and replaced during animation. The cleanest solution was to use small Neodymium magnets. I drilled two holes into the head that allowed the magnets to be counter sunk. One magnet below the eyes to hold the mouth masks and another on the forehead to hold the brow masks.

The magnets where glued into place with epoxy. Next I marked the location of the magnet onto the inside of each mask. This location indicated where a small amount of metal needed to be added. This is what the magnet would be attracted to, holding the mask in place against the head.

I cut the heads off some steel tacks and counter sunk them into the backs of the masks. The flat head and size of the tacks worked well with the magnets. If I had used to much metal the attraction to the magnet would have been too strong, making the faces difficult to remove. Not enough metal would mean the faces didn't stick. I added the tacks to all ten mouth masks and the three brow masks, gluing them into place using epoxy.

The next stage was to sculpt in the mouth details using Super Sculpey polymer clay. I started by sculpting the neutral mouth expression. In the picture above you can see the early stages of the sculpt. Also you can see some small progression with the dress.

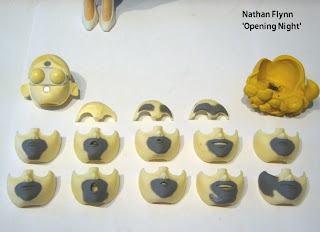
Above are some more mouths sculpted. I'm only making the expressions that I need for this film so I've used the storyboards to help plan what mouth shapes are used. These include shocked, sad, bored and multiple different smiles. The three brows were sculpted into neutral, raised brow and frowning expressions.

While sculpting the mouths I kept checking to see if they worked on camera. I used my Canon DSLR connected to a laptop with Stop Motion Pro 7. This gave me a live view and I could flick between captured images to see if the faces worked in relation to each other. I took pictures of the head from the front and from the side. Any problems were easily identified and corrected before that clay was baked hard.

The picture above shows all the masks I've made for Elle including ten different mouths and three brows. After baking these were sanded smooth ready for priming.

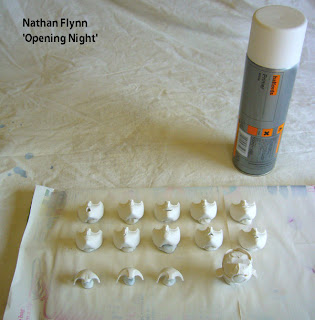
I painted the masks and the head with a white primer spray paint. This gives a good base coat for the next layer of paint to stick to. I suspended each part away from the surface so avoid any paint pooling at the edges. Also I masked the back of each face to stop any paint from sticking there. Any paint of the back might cause unwanted friction when putting the faces onto the head. I covered the front of the head with masking tape for the same reason.

After applying a few layers of primer and allowing it to set, I added the skin tone colour. Again I used a spray can. This was to ensure that each mask was the same colour. Mixing the paint and brushing by hand might have led to unwanted variations in colour. Also this spray paint will hold up better to constant handling.
I made sure that I matched this colour when I pigmented the silicone used for the arms and legs so all the skin tones on the puppet will be consistent.

Above are all the components after being sprayed. The next stage will be to paint details like teeth, lips and make-up onto each mask.

Thanks for reading.

Sunday, 24 April 2011

Stages, Lights and Costumes

All my posts seem to have been about puppets recently, so I thought I'd show something different today.
Pretty soon me and Josh are going to be making sets and we need a stage to build and film on. The stage needs to be very sturdy, any wobble would cause the sets to move and ruin a shot.
We plan to shoot our film on two stages. One in our university and one at home in our garage. This means we can both be working on different scenes simultaneously. Our University has most of the equipment needed for filming but we need to assemble a second set to allow us to film in our garage.

Firstly we cleared a space wear the stage table would be built. Space is a bit tight so we had to build the table in situ. We cut all the legs, making sure they were the same length and braced them.

Above you can see the frame for the table top to rest on.
( the exercise bike lives in the garage. we couldn't find a new home for it so we had to build the stage around it.)

Finally we attached the MDF board to make the table surface. The table feels really solid and heavy so there shouldn't be any problems with the set moving. The stage is roughly 6 feet wide giving us plenty of space to build sets on. Also the height of the table is important. Most stop motion animatiors prefer to work standing up. A higher working surface is more comfortable to work with.

We will be blocking out the window to stop external light entering the garage. Any variable light such as sunlight would cause flicker in the animation.

Lighting
To light our set we have purchased 3 red head spot lights. These are mounted on light stands and each has a dimmer. This will allow us to control the intensity of each light independently.

Also the lights have a focus control and barn doors for fine tuning the light output.

Clothes
Time to get back to puppet construction. The puppets in our film have real fabric clothes, made in a similar way to regular clothes, only smaller. Above are the early stages of Elle's dress. It's made in two parts to allow the puppet to be dismantled. This makes it easier to get the cloths onto the puppet. The join at the waist will be disguised by a white ribbon belt. You can see the character design HERE.
Also you can see progress on the Mail Mans clothes HERE on Josh's blog.

Finally,  the picture above shows the puppet after being dismantled.

In my next post I will be showing how I made the replacement faces for the puppet and how they will attach to the head.
Thanks for looking.

Friday, 22 April 2011

Puppet Assembly

In my last post I cast out all the silicone components for the character 'Elle'.
After some quick clean up I assembled all the new parts together using the slot together K&S points that I designed into the armature.

Above is the puppet standing upright, being supported with steel wire at the hip rig point. I tested the knee and elbow joints to see if they flex correctly and everything is working nicely. Its best not to reposition the puppet too much before filming to extend the life of the aluminium wire.


The hair is cast in yellow silicone with some aluminium wire inside. I will be painting onto the surface to bring out the details and make it appear more like blond hair. The only sponge padding needed was at the waist. This is a relatively small amount in caparison to the Mail Man puppets. You can read Josh's post about bulking out the puppet HERE.

Speaking of the Mail Man.... above are the feet I cast for him. Mixing the dark colour proved difficult as the original colour of my silicone is white. This meant I had to add a lot of black oil paints and I was concerned that adding too much would stop the silicone from curing. In the end everything worked fine.
Above are the 2 pairs of shoes for the 2 identical Mail Man puppets. You might be able to spot two small air bubbles on the second shoe from the back. This is only a minor imperfection and can easily be  filled with more silicone.

The final parts to be cast were the Theatre Usher's hands. As before the hand armature was suspended in the mold with the K&S at the wrists.

The hands were cast in flesh tone silicone that will match the colour of the puppets face.
Above are the hands with the excess silicone cut off. The seams still need to be cleaned up

Trimming and Seaming
In my last post I mentioned about 'Trimming and Seaming'. This is the process of cleaning and removing the seam lines caused by the two part moulds. There are lots of different techniques for this. I've been using the stone tool  on my dremel to gently sand away the lines. Applying Vaseline to the stone tool helps to stop the silicone from snagging and slowly but surly the line reduces.
Alternately, for a more professional finish, the seams can be cut away leaving a small trench. This trench is then filled with more silicone, masking the lines. Before the silicone fully cures talcum powder is added to the surface to stop the silicone from being shiny. Once everything is set, the talcum power washes away leaving a smooth and invisible seam. This method gives better results but is very time consuming.
I'm pleased with the results I got using the dremel.

That's all for today, Thanks for reading.

Wednesday, 20 April 2011

Casting - Puppet Body

Now that I've finished making all the moulds for my puppet it's time to cast out all the body parts. To do this I suspend the wire armature parts inside the mould, and encase them in silicone.

Cleaning up the mould

The original Plastiline sculpture of the body parts are destroyed when they are removed from the mould. This seems a bit strange at first considering all the time and effort that was put into sculpting them. But it's a necessary part of the process and the armature needs to be recovered.
Terracotta clay washes off the mould with warm water and Turpentine dissolves Plastiline. I use a stiff bristled brush to get into all the small crevasses.
After all the mould is wiped clean I inspect the inner surface for any air bubbles and imperfections. These are filled with Milliput and sanded smooth.
Above is the mould for the legs after it was cleaned up. It's very important to clean the inner surface as any dirt or imperfections will show up on the castings later. I test fitted the armature back into the mould to make sure they still fit into place. I also made sure no parts were touching the edges where they shouldn't be. Its a good idea to practise putting the armature back into the mould, because when it comes time to cast you don't want to run into any problems.
In the picture above you can see I've stuck some Cotton material to the upper legs. This is to help the silicone stick. Also I painted a layer of acrylic paint over all the K&S parts that will come in contact with silicone. I've hear that brass can react with some silicons and discolour it. The paint will act as a shield, just in case.

Casting
The Silicone I'm using it very soft and flexible. This is important because I don't want the silicone to fight back against the wire when I bend the puppet.
I pigment the silicone to the desired colour so that I don't have the paint it after casting. Painting silicone is difficult as most paint can't stick to silicone. Also the paint would have to be flexible and resist constant handling. Pigmenting the silicone is an easier option. To do this I add a small amount of oil paints. I try not to add more that 5% of paint to the silicone so that I don't mess up the chemistry. Adding too much could stop it from curing.
In the picture above I have painted the first layer of silicone into each half of the mould using a brush. I added white to the shoes and flesh colour on the rest of the leg. By letting this first layer set it will stop air bubbles from appearing on the outer surface of the legs. Also it will prevent the armature from touching the edge of the mould.

Above it the chest section of the armature resting in it's mould. Again the armature has cloth and paint applied onto it. Also I have wrapped cling film (saran wrap) around the ball and socket joints to stop the silicone from clogging the joint.
When casting I paint the first layer of flesh coloured silicone into both halves of the mould and let it set. I then top up the halves filling them all the way. While the silicone is still runny I slot the armature into one half of the mould causing it to overflow. This is good as it helps to reduce air bubbles. Its better to have too much than too little. 
The next step is to quickly sandwich the two halves together and squeeze them tight using clamps. In the pic above I've used two clamps to hold the mould together. They stay on until the silicone has cured.
When the silicone it set  ( roughly 4-5 hours) I gently open the mould using a screw driver for leverage.

Above is the chest section after it was removed from the mould. As you can see it still has the thin film of excess silicone surrounding it. This is cut off with a small pair of scissors. The seam lines will need to be cleaned up in a process called 'Trimming and Seaming'.( more on that later )

The same process was used to cast all the puppets silicone parts. Above is the mould for the Mail Mans hands with the armatures resting in them.

Here are the cast hands after I separated the two halves of the mould.

Above are the hands in the early stages of trimming and seaming.

Here are the Actresses hands after being cast. They were cast in the silicones natural white colour because the Actress 'Elle' is wearing elbow length gloves.


Finally here's a shot of the newly cast legs standing in front of their mould. They've had a little bit of clean up done but I will explain more about 'Trimming and Seaming' in my next post. Also I'll show all the parts assembled including the Hair.

Thanks for reading.

Monday, 18 April 2011

Mould Making - Body

OK, Here's part two of my Mould Making Marathon.
In my previous post I made two part moulds to cast shoes for the Mail Man and hands for the Theatre Usher.
In this post I'm moulding parts for 'Elle' the Actress. Earlier I started to sculpt the body shapes onto the wire armature in grey Plastiline. You can see that post HERE.
Below is the finished sculpt ready to be moulded.

The body breaks up into five sections. 2 legs, 2 arms and the chest section. All these will be cast in flexible silicone so rigid two part moulds are needed.

I'm moulding both legs together in the same mould. This saves on time and the materials used. It also makes it easier to cast both legs at the same time. The split line will run down the inside and outside of each leg and around the base of the shoe.

As before I added plasticine keys and built a foam board box around the clay. The biggest difference with this mould is that the clay wall was built up higher against the sole of the shoes. I had to be careful that this still allowed the two half of the mould to be separated.

Above are the legs ready to have the second half of the mould added.

The chest is made in the same way. You may have noticed that I added K&S to the arms. The K&S helps to suspend the armature in the mould when its time to cast. I add Vaseline to the K&S to stop it from sticking to the polyurethane resin.


Below is a close up picture of the arms ready to be moulded. They are elbow length gloves and will be cast in white silicone. I forgot to take any pictures while I was moulding these so you'll have to take my work for it.
Hair Sculpt

The final part of the actress puppet to be moulded was the hair. I decided to cast it in silicone because I want the hair to have some movement. I hope that by having wire inside a silicone hair piece, I will be able to give the hair some bounce when animating.


Above is the final sculpt for the hair. Its made in Plastiline and attaches to the back of the head with  K&S. Once again I made a two part mould.

The sculpture featured some small undercuts but because I'm casting in a soft and flexible silicone they didn't cause any problems.
That's the end of my mould making marathon. I now feel much more confident at making two part moulds, but I'm glad I can now move on and concentrate on other aspects for puppet building.

I thinks that enough for today.
Next I'll be using the moulds I've made and casting all the body parts in coloured silicone.
Thanks for looking.